A friend of mine recently bought a new house. He was excited because the previous owners had wired the entire house with speaker wiring and coax cabling so that audio and video could be distributed throughout the house. There was one major problem: none of the wiring was labeled and you didn’t know where the wires went!
 |
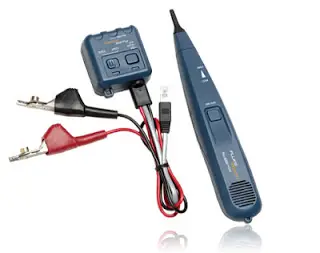
The Fluke Pro3000 Analog Tone and Probe
is a powerful and easy way to find where
speaker and data wiring starts and
ends up in your home |
The initial excitement turned into a daunting prospect: how on earth would we figure out what wires went where. There were wires on the lower level, wires in the upper level. Wires leading to some in-ceiling speakers that were pre-installed and wires behind blank plates. It just made no sense.
There are many things that we could have done to
try and sort out the wires. The best and most straightforward solution, however, was to use an analog tone probe. In case you’ve never seen this device before, it’s a God-send! In our particular case, we used the Fluke Pro3000 Analog Tone and Probe (you can use the
Fluke Networks reseller finder to locate a dealer near you).
What it does is send a signal through the wire you are trying to trace. You can then find that wire using a supplied probe that will buzz when you put the probe near the wire that is carrying the signal. It’s like a metal detector for wires.
In our case, it reduced potentially hours and hours of fruitless work into less than two hours of work to find the source and end point of all the wiring on two floors.
 |
Tone generators are simple and easy to use to find
data and speaker cables but never use them
on electrical wires! This image shows how you can
use the Fluke Pro300 to tone out wires |
If you run into such a situation in your home—either with wiring that was already there in your home or with wiring that you yourself ran but forgot to label—make sure that once you trace a wire, you label it accordingly! There’s nothing more frustrating than finding the source of a wire only to later forget or lose where that wire went. Improper labeling can cause many issues in your audio system—from phase issues to shorting out one of your pieces of equipment.
One of the sure-fire methods that I like to use when labeling my wiring is to use an electrical wire marker book. These books are sold both online and at major hardware stores such as Home Depot or
Lowes.
These special labels are absolutely fantastic. They are made of vinyl and have strong and industrial-strength adhesive that will stick well to the wires. They are far better than using a permanent marker on the cable jacket. As a general rule of thumb, you want to plan out a wire mapping guide for your installation.
One simple method that I suggest is using the floor followed by a number. So, for example, if you are running the first wire on the first floor, you would label it as 101 (1 for the floor and 01 for the wire run). The second wire would be 102, the third wire 103 and so on. When you get to the second floor, the first wire run would be 201, then 202, etc. If you have a basement, you could label the wire runs as B01, B02, etc. It really doesn’t matter what naming convention you use to mark you wires so long as it’s consistent throughout. And don’t forget one very important thing: make sure that you mark both ends of your wires!
 |
An Electrican’s wire marker book is the best way to mark your
wires so that you can trace them and avoid costly installation mistakes that may damage your equipment |
In the end, we were able to trace out every single wire, identify that one of the ceiling speaker wires was corrected improperly and ultimately my friend found that he had wiring for a 5.1 system in his basement and wiring for a second 5.1 system on the first floor.
So, if you ever find yourself trying to trace out speaker wires or data wires, use an analog tone generator and probe. It’s an inexpensive tool that will cost you around $50-$80 and save you multiples of that amount in time and frustration.
You can contact me at: info@pooraudiophile.com or visit me at:


!function(d,s,id){var js,fjs=d.getElementsByTagName(s)[0];if(!d.getElementById(id)){js=d.createElement(s);js.id=id;js.src=”//platform.twitter.com/widgets.js”;fjs.parentNode.insertBefore(js,fjs);}}(document,”script”,”twitter-wjs”);


